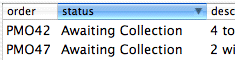
If you wish, orders can be sorted by order number, by status or by description. Simply click on the relevant column header.
As described in the Overview chapter, use the Search box to locate an order by any one of its text fields; title or details, for example.
To print an order list, make sure that it is showing and selecting File > Print from the menu (command-P).
Create a new order by pressing the New Order icon in the toolbar, or by selecting File > New > Order (command-N)
Note that the OK button serves to save the order. Certain actions which remove that order from view, ie choosing to edit a different order or quitting the application, may loose any changes. After creating or editing an order, make sure that you click OK to ensure that the changes are saved.
When a new order is created the default order date is today. This may be edited; see Overview for information about entering dates and date formats.
The Order number will be auto-filled with a sequential number prefixed with a code which you can specify in preferences. However, you can edit this as you like without fear of breaking links.
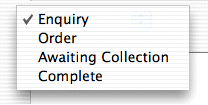
The default status is 'Enquiry'. Use this status box to track the workflow of an order and see at a glance which orders you have awaiting collection, which are due to be completed next etc.
Note that you can alter this list of statuses in preferences.
Tip: use this field to help avoid missing opportunities - make a new entry whenever you receive an enquiry. make a point of following all enquiries up after a suitable period and leave this open until it either becomes an order or the customer makes it clear that they are no longer interested.
To print out the details in the Description field, click once inside that field and select File > Print
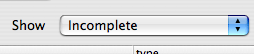
The selection box at the top of the list may be set to 'All' or 'Incomplete'. If set to 'Incomplete' (the default) then orders that have their status set to 'Complete' are not shown. Note that this feature does rely on the status 'Complete' existing in the list of statuses which you can edit in preferences.
Files can easily be attached to an order. Simply drag the file into the well which is at the bottom of this first (Order Details) tab. Alternatively, use the Attach button. Files are copied (into the user's Organise database) therefore the original file may be moved or deleted without affecting the attachment.
In order to manage or open the attached files, click the View Attachments button. A finder window is opened which contains the attached files for that order. To delete files, click View Attachments and simply drag them out of this window to the Trash.
The second tab of the order editor window allows you to associate this order with one of the existing contacts or create a new one.
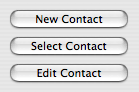
Use the Select Contact button to choose an existing contact or company from the contact list.
As from version 5.5 you can select a contact from the OSX Address Book, and those contacts (as long as the ref number isn't altered) then allow updating from the Address Book.
If you wish you may create a new contact from here by using the New Contact button. After you have finished editing that new contact, it will be selected here. When a contact is associated with the order, you can edit the contact from here by using the Edit Contact button.
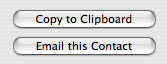
The Copy to Clipboard button copies the entire name and address to the clipboard so that it can be pasted into another application, eg a word processor. This is useful when writing a letter to the customer.
The Email button opens up an email addressed to this contact
Attachments

Contact